Thursday, July 30, 2015

First trip to East State Penitentiary

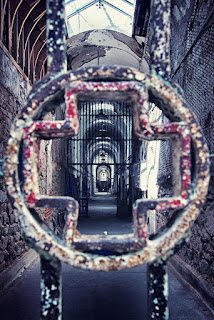
I must admit. I never thought I would see the inside of a penitentiary. I am a clean cut guy with no nefarious deeds to my name. Plus, the though of incarceration makes me break out in sweat. However, my love of photography takes me to strange locations and infuses me with more tenacity then I thought possible. So, with my camera as my guide, I decided to take a tour of East State Penitentiary. This is a location that screams to be shot. No pun intended. The derelict walls and structures create a cornucopia of textures and shapes that allow for various angles on interest. The only issues I had with this location was the limited access. If you are a fan of architecture I recommend taking a tour. However, if you plan on taking pictures, I recommend you take these three things in mind. Firstly, bring a tripod or mono-pod.  Most of the  penitentiary is dark with beams of light cascading around the structure. A tripod with allow for longer exposures and cleaner images (Note the grain in the first image). Secondly, go early. The less people in the location the better. It decreases the likelihood that you will have to compete with a  someone else for a shot. Particularly, someone taking pictures with an ipod or iphone. A Three, try HDR. The second shot I provided below is an HDR image. By taking three images an combining them, I was able to gain more detail that I ever could with one exposure. As far as lenses and cameras, shoot with had you have and with what you like. It's an expression of your art. Not mind. Just have fun!

I will take my own advice an revisit the penitentiary. Next time I should get cleaner images, and hopefully, a few more interesting angle. I can't wait! Maybe I'll see you there!




Monday, January 19, 2015

Just Me


Just Me. Using the Canon 6D with the 70-200mm F4 at 70mm. One Yongnuo YN560III with a shoot through umbrella was used to light the scene.

Saturday, October 25, 2014

Night Lights


All Images taken with the Canon 6D using a 12mm to 24mm Tokina lens (at 20mm) at F18 with a 25 second shutter.

Sunday, October 19, 2014

Double Exposure.

Since I first purchased my Canon 6D, I've been curious about double exposures. I always thought that they were difficult to create. And truthfully, I've only slightly moved from that opinion. This is because I've learned a few things about how they are created. For instance, I now know that they can be created  in camera and with software. This is useful because it allows me to see what works and what does work, without creating monstrosities in camera. Photoshop is an excellent learning tool that has giving me the confidence to dedicate future shoots strictly to doing double exposures. What software allows in a chance to see how low and high contract images blend in a non-destructive environment. So now I know that silhouettes are probably the best images to double expose. I've also learned that the best background images have consistent themes that are relatively simple.

As I learn more doing digital double exposures, I will incorporate that knowledge into in camera shooting. And, I'm looking forward to the learning process.

For now. I only have a couple shots that I've done thus far. I have no doubt I will get better as I learn  and practice more. I only hope you can appreciate my initial contributions.

Sunday, August 31, 2014

Compression Changes Everything

I had the opportunity to visit Hudson River Park in New York City today. It offers terrific views of the city. After a fruitful daytime visit, I look forward to visiting the park for a night shoot. As it was, this location provided the perfect opportunity to show how telephoto lenses compress the image. While wide angle lenses makes the background seem further away. The first picture was taken with a 24 to 105mm lens at 24mm's and the second was taken at 8mm. Despite both of these lenses being relatively wide you can see way more compression in the first image. So, if you want to make the background seem far from the foreground or you want to show more of the background, use a wider lens. If you want to unclutter the background as to drawl more attention to the foreground use a longer lens. This is even more pronounced in the 3rd and 4th images. The 3rd was shot at 35mm's and the 4th at 8mm's.  The 1st and 2nd images were taken from the same spot and the 3rd and 4th were taken from the same spot. I hope if nothing you enjoy the images. The 1st and 3rd images are featured in my fine art store. They can be purchased here.

For a more technical explanation on compression or the effects of perspective distortion, check out the following link:  http://en.wikipedia.org/wiki/Perspective_distortion_(photography)


Wednesday, August 27, 2014

The Beauty of Longwood Gardens

I took a trip to Longwood Gardens. Personally I think it's a magical place, especially if you love to photograph flowers. Although it was a rainy day, I was still able to enjoy a great deal of the flora. The conservatory there is filled with various types of plant life as well as other attractions.

Here are a few of the shots I took.


Maternity Photography

I was very fortunate to capture these images. I used the Canon 6D with the 70mm to 200mm Canon 4f L series lens. The images were lit using two alien bees strobes and the occasional Yongnuo speedlight.I used a 60 inch octagonal as the key light. and a 16 inch softbox on the background during high key shots. For low key shots I used the same setup. But, I moved the softbox around and decreased the power by a stop.